vite+vue3+ts 项目搭建
1.项目采用 pnpm 的包管理工具,所以需要全局安装 pnpm
npm install pnpm -g2.安装 vite
npm install -g vite3.使用 vite3 创建项目(使用 vue-ts 模板)
pnpm create vite my-vue-app --template vue-ts4.修改 vite-env.d.ts 文件
/// <reference types="vite/client" />

declare module "*.vue" {
  import type { DefineComponent } from "vue";

  const component: DefineComponent<{}, {}, any>;
  export default component;
}
5.插件准备
插件:Stylelint、ESLint、Prettier - Code formatter
工作区插件配置:
{
  "editor.formatOnSave": true,
  "editor.defaultFormatter": "esbenp.prettier-vscode",
  "editor.codeActionsOnSave": {
    "source.fixAll.eslint": true,
    "source.fixAll.stylelint": true
  },
  "stylelint.validate": ["css", "less", "scss", "vue"]
}
6.使用 eslint 初始化当前项目使用 eslint
1.package.json 加入脚本
"scripts": {
"lint:create": "eslint --init",
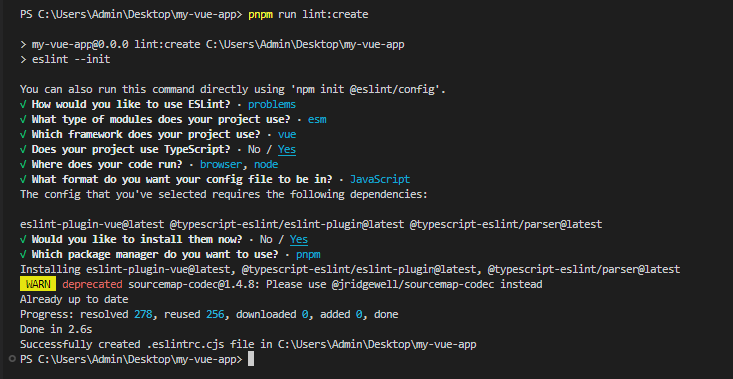
},2.执行 pnpm run lint:create
3.选择配置项

7.配置使用 eslint、prettier 对代码进行格式化
1.安装 eslint、prettier、相关校验规则依赖
pnpm install eslint eslint-plugin-vue eslint-config-prettier prettier eslint-plugin-import eslint-plugin-prettier eslint-config-airbnb-base -D2.初始化 eslint 项目后,项目根目录会生成.eslintrc.cjs 文件,重写该文件
module.exports = {
  env: {
    browser: true,
    es2021: true,
    node: true,
  },
  extends: ["plugin:vue/vue3-strongly-recommended", "airbnb-base", "prettier"],
  parser: "vue-eslint-parser",
  parserOptions: {
    ecmaVersion: 13,
    parser: "@typescript-eslint/parser",
    sourceType: "module",
    ecmaFeatures: {
      tsx: true,
      jsx: true,
    },
  },
  globals: {
    defineProps: "readonly",
    defineEmits: "readonly",
    defineExpose: "readonly",
    withDefaults: "readonly",
  },
  plugins: ["vue", "@typescript-eslint"],
  settings: {
    "import/resolver": {
      alias: {
        map: [["@", "./src"]],
      },
    },
    "import/extensions": [".js", ".jsx", ".ts", ".tsx", ".mjs"],
  },
  rules: {
    "import/no-extraneous-dependencies": 0,
    "no-param-reassign": 0,
    "vue/multi-word-component-names": 0,
    "vue/attribute-hyphenation": 0,
    "vue/v-on-event-hyphenation": 0,
  },
};
3.项目根目录下新增.eslintrcignore 文件,取消对不必要文件的语法校验和格式化
*.sh
node_modules
*.md
*.woff
*.ttf
.vscode
.idea
dist
/public
/docs
.husky
/bin
.eslintrc.js
prettier.config.js
/src/mock*

# logs
*.log
npm-debug.log*
yarn-debug.log*
yarn-error.log*
pnpm-debug.log*
lerna-debug.log*

.DS_Store
dist-ssr
*.local

/cypress/videos/
/cypress/screenshots/

# Editor directories and files
.vscode
!.vscode/extensions.json
.idea
*.suo
*.ntvs*
*.njsproj
*.sln
*.sw?

components.d.ts
4.安装 eslint-import-resolver-alias @types/eslint @types/node 依赖
pnpm install eslint-import-resolver-alias @types/eslint @types/node -Deslint-import-resolver-alias 使项目中支持通过别名 import、支持 import 自定义类型的文件
@types/eslint 是 eslint 的类型定义包,@types/node 是 node 的类型定义包,这些包用来加载所有的定义类型(当你在项目中使用了 ts 且引入了一些包时,如果他们默认不包含类型,就必须添加他们的类型定义包)
5.安装 vite-plugin-eslint 插件并在项目中使用
1.安装插件
pnpm install vite-plugin-eslint -D2.配置 vite.config.ts 文件使用 vite-plugin-eslint 插件(该插件能在开发的过程中在页面实时显示代码格式或语法的错误)
import { defineConfig } from "vite";
import vue from "@vitejs/plugin-vue";
import eslintPlugin from "vite-plugin-eslint";

// https://vitejs.dev/config/
export default defineConfig({
  plugins: [vue(), eslintPlugin()],
  server: {
    host: "localhost",
    port: 9999,
    open: true,
  },
});
6.配置 package.json,eslint 校验并修复代码脚本
"scripts": {
  "lint": "eslint \"src/**/*.{js,vue,ts}\" --fix"
},
此时可以运行pnpm run lint来校验并修复存在代码格式或语法错误的文件
(此时的pnpm run lint修复的代码可能会与编辑器prettier插件自动保存时的风格存在冲突)
7.解决 eslint 与 prettier 的校验规则冲突
1.项目根目录下新增.prettierrc.cjs 文件,并写入内容:
module.exports = {
  printWidth: 100, // 最大行长规则通常设置为 100 或 120
  tabWidth: 2, // 指定每个标签缩进级别的空格数
  useTabs: false, // 使用制表符而不是空格缩进行
  semi: false, // true(默认): 在每条语句的末尾添加一个分号。false:仅在可能导致 ASI 失败的行的开头添加分号
  singleQuote: true, // 使用单引号而不是双引号
  quoteProps: "as-needed", // 引用对象中的属性时,仅在需要时在对象属性周围添加引号
  jsxSingleQuote: false, // 在 JSX 中使用单引号而不是双引号
  trailingComma: "es5", // "none":没有尾随逗号。"es5": 在 ES5 中有效的尾随逗号(对象、数组等),TypeScript 中的类型参数中没有尾随逗号。"all"- 尽可能使用尾随逗号
  bracketSpacing: true, // 在对象文字中的括号之间打印空格
  arrowParens: "always", // 在唯一的箭头函数参数周围始终包含括号
  // 格式化文件范围是文件的全部内容
  rangeStart: 0,
  rangeEnd: Infinity,
  requirePragma: false, // 需要编译指示
  insertPragma: false, // 插入编译指示
  proseWrap: "never", // 如果散文超过打印宽度,则换行
  htmlWhitespaceSensitivity: "css", // 根据显示样式决定 html 要不要折行
  endOfLine: "lf", // 确保在文本文件中仅使用 ( \n)换行,常见于 Linux 和 macOS 以及 git repos 内部
  // vueIndentScriptAndStyle: true, // Vue 文件脚本和样式标签缩进
  // bracketSameLine: false, // 将>多行 HTML(HTML、JSX、Vue、Angular)元素放在最后一行的末尾,而不是单独放在下一行(不适用于自闭合元素)
};
2.项目根目录下新增.prettierignore 文件,取消对不必要文件的格式化
/dist/*
.local
.output.js
/node_modules/**
src/.DS_Store

**/*.svg
**/*.sh

/public/*
components.d.ts
8.配置 package.json,prettier 格式化代码脚本
问:之前配置的 eslint 不就可以对代码进行校验和修复吗,这里为什么又使用 prettier 对代码进行格式化?
答:eslint 更倾向于语法的校验和修复,而 prettier 是专门对代码风格进行格式化的,我们该项目两者都使用,也就是先用 eslint 对代码的语法进行校验和修复,再用 prettier 对代码风格进行格式化
"scripts": {
  "prettier-format": "prettier --config .prettierrc.cjs \"src/**/*.{vue,js,ts}\" --write",
},
此时可以运行pnpm run prettier-format来格式化代码
8.对 tsconfig.json 文件的配置进行修改
{
  "compilerOptions": {
    // 指定es目标版本
    "target": "ESNext",
    "useDefineForClassFields": true,
    "module": "ESNext",
    // 决定如何处理模块
    "moduleResolution": "Node",
    "strict": true,
    "strictNullChecks": false,
    "jsx": "preserve",
    "sourceMap": true,
    "resolveJsonModule": true,
    // "isolatedModules": true,
    "esModuleInterop": true,
    // 编译过程中需要引入的库文件列表
    "lib": ["ESNext", "DOM", "DOM.Iterable"],
    // 默认所有可见的@types包会在编译过程中被包含进来
    "types": ["vite/client"],
    // 解析非相对模块名的基准目录
    "baseUrl": ".",
    // 模块名到到基于baseUrl的路径映射的列表
    "paths": {
      "@/*": ["./src/*"],
      "*.ts": ["*"]
    }
  },
  "include": ["src/**/*.ts", "src/**/*.d.ts", "src/**/*.tsx", "src/**/*.vue"]
}
9.使用 lint-staged 只对暂存区的文件进行格式化
1.安装 lint-staged
pnpm install husky lint-staged -D2.安装 husky
1.安装
pnpm install husky --save-dev2.激活钩子
npx husky install2.设置安装依赖时自动激活钩子脚本
pnpm set-script prepare "husky install"3.package.json 添加 lint-staged 节点,用 lint-staged 对暂存区文件进行格式化
"lint-staged": {
  "*.{js,jsx,vue,ts,tsx}": [
    "npm run lint",
    "npm run prettier-format"
  ]
}
4.添加 husky 钩子,提交时触发 npx lint-stage 命令
npx husky add .husky/pre-commit "npx lint-staged"10.规范 git 提交信息
1.安装 commitizen 规范 Git 提交说明
Commitizen 是一个撰写符合 Commit Message 标准的一款工具,可以帮助开发者提交符合规范的 Commit Message
pnpm install commitizen -D2.安装 cz-customizable(cz-customizable 是本地适配器)
pnpm install cz-customizable -D3.配置 commitizen,使用 cz-customizable 作为信息交互插件,在 package.json 中添加下面节点
"config": {
  "commitizen": {
    "path": "node_modules/cz-customizable"
  }
}
此时可以执行 git cz 来进行信息交互的方式commit
4.项目根目录下创建.cz-config.cjs 文件并配置
1.配置 package.json
"config": {
  "commitizen": {
    "path": "node_modules/cz-customizable"
  },
  "cz-customizable": {
    "config": ".cz-config.cjs"
  }
},
2.新增.cz-config.cjs 文件
module.exports = {
  // type 类型(定义之后,可通过上下键选择)
  types: [
    { value: "feat", name: "feat: 新增功能" },
    { value: "fix", name: "fix: 修复 bug" },
    { value: "docs", name: "docs: 文档变更" },
    {
      value: "style",
      name: "style: 代码格式(不影响功能,例如空格、分号等格式修正)",
    },
    {
      value: "refactor",
      name: "refactor: 代码重构(不包括 bug 修复、功能新增)",
    },
    { value: "perf", name: "perf: 性能优化" },
    { value: "test", name: "test: 添加、修改测试用例" },
    {
      value: "build",
      name: "build: 构建流程、外部依赖变更(如升级 npm 包、修改 webpack 配置等)",
    },
    { value: "ci", name: "ci: 修改 CI 配置、脚本" },
    {
      value: "chore",
      name: "chore: 对构建过程或辅助工具和库的更改(不影响源文件、测试用例)",
    },
    { value: "revert", name: "revert: 回滚 commit" },
  ],
  // scope 类型(定义之后,可通过上下键选择)
  scopes: [
    ["components", "组件相关"],
    ["hooks", "hook 相关"],
    ["utils", "utils 相关"],
    ["element-ui", "对 element-ui 的调整"],
    ["styles", "样式相关"],
    ["deps", "项目依赖"],
    ["auth", "对 auth 修改"],
    ["other", "其他修改"],
    // 如果选择 custom,后面会让你再输入一个自定义的 scope。也可以不设置此项,把后面的 allowCustomScopes 设置为 true
    ["custom", "以上都不是?我要自定义"],
  ].map(([value, description]) => {
    return {
      value,
      name: `${value.padEnd(30)} (${description})`,
    };
  }),
  // 是否允许自定义填写 scope,在 scope 选择的时候,会有 empty 和 custom 可以选择。
  // allowCustomScopes: true,
  // allowTicketNumber: false,
  // isTicketNumberRequired: false,
  // ticketNumberPrefix: 'TICKET-',
  // ticketNumberRegExp: '\\d{1,5}',
  // 针对每一个 type 去定义对应的 scopes,例如 fix
  /*
  scopeOverrides: {
    fix: [
      { name: 'merge' },
      { name: 'style' },
      { name: 'e2eTest' },
      { name: 'unitTest' }
    ]
  },
  */
  // 交互提示信息
  messages: {
    type: "确保本次提交遵循 Angular 规范!\n选择你要提交的类型:",
    scope: "\n选择一个 scope(可选):",
    // 选择 scope: custom 时会出下面的提示
    customScope: "请输入自定义的 scope:",
    subject: "填写简短精炼的变更描述:\n",
    body: '填写更加详细的变更描述(可选)。使用 "|" 换行:\n',
    breaking: "列举非兼容性重大的变更(可选):\n",
    footer: "列举出所有变更的 ISSUES CLOSED(可选)。 例如: #31, #34:\n",
    confirmCommit: "确认提交?",
  },
  // 设置只有 type 选择了 feat 或 fix,才询问 breaking message
  allowBreakingChanges: ["feat", "fix"],
  // 跳过要询问的步骤
  // skipQuestions: ['body', 'footer'],
  // subject 限制长度
  subjectLimit: 100,
  breaklineChar: "|", // 支持 body 和 footer
  // footerPrefix : 'ISSUES CLOSED:'
  // askForBreakingChangeFirst : true,
};
此时可以执行 git cz 来进行信息交互的方式commit(交互信息变为中文)
5.安装 commitlint 检查提交消息是否符合常规提交格式
pnpm install @commitlint/cli @commitlint/config-conventional -D6.项目根目录下创建 commitlint.config.cjs 文件,并标明 commitlint 校验时使用的规范是@commitlint/config-conventional
注意:该处用的提交格式规范是 Conventional Commits,预先配置的 commitizen 信息交互模板要按照前者的规范来配置
module.exports = { extends: ["@commitlint/config-conventional"] };7.添加 husky 钩子,提交时触发 commitlint 校验
npx husky add .husky/commit-msg 'npx --no -- commitlint --edit $1'8.现在 commit 都会触发 commitlint 中指令来校验提交信息的格式,但是我想每次 commit 都是通过信息交互的方式进行内容填写,可以在 package.json 中添加脚本命令
"scripts": {
  "commit": "cz",
}
此时每次commit直接执行pnpm run commit就行
11.配置使用 lint-staged 触发 stylelint 格式化 css
1.安装相关依赖
pnpm install stylelint postcss postcss-html stylelint-config-recommended-vue stylelint-config-standard-scss -D2.项目根目录下创建.stylelintrc.cjs 文件,并使用相关规则
module.exports = {
  extends: [
    "stylelint-config-standard-scss",
    "stylelint-config-recommended-vue/scss",
  ],
};
3.项目根目录下创建.stylelintignore 文件,取消对不必要文件的格式化
/dist/*
/public/*
4.配置 package.json,stylelint 格式化 css 脚本
"scripts": {
  "lint:css": "stylelint **/*.{vue,css,sass,scss} --fix"
},
5.安装 vite-plugin-stylelint 插件并在项目中使用
1.安装插件
pnpm install vite-plugin-stylelint -D2.配置 vite.config.ts 文件使用 vite-plugin-stylelint 插件
import { defineConfig } from "vite";
import vue from "@vitejs/plugin-vue";
import eslintPlugin from "vite-plugin-eslint";
import StylelintPlugin from "vite-plugin-stylelint";

// https://vitejs.dev/config/
export default defineConfig({
  plugins: [vue(), eslintPlugin(), StylelintPlugin({ fix: true })],
  server: {
    host: "localhost",
    port: 9999,
    open: true,
  },
});
6.package.json 中使用 lint-staged 触发 stylelint 格式化 css 脚本
"lint-staged": {
  "*.{js,jsx,vue,ts,tsx}": [
    "npm run lint",
    "npm run prettier-format"
  ],
  "*.{vue,css,sass,scss}": [
    "npm run lint:css"
  ]
}